Labels

5 Best Websites to Sell Your Old Gadgets

Nothing Last forever especially electronics. Gadgets are playing an important role in everyone’s life but with technology getting better and more advanced, gadget are too are getting updated with new features. We desire for the most updated gadgets to make our life easier.

How To Add Google Plus Followers Gadget To Blogger!

One of the best perks of using Google is, it has products that seamlessly integrate with each other to provide an easy and comprehensive interface to users. For example, Google Drive can be used to attach files with emails quickly. You can +1 posts outside Google+, and share search results on Google Plus. You can even auto-publish your Blogger blog feed to your G+ profile. And that is by no means the end of it. In fact, Google just announced a brand new feature, the Google Plus Followers gadget for blogger blogs! This new Google Plus followers' gadget for blogspot blogs will provide another layer of integration between your Google Plus profile and your Blogger/Blogspot blog.

Featured 3

Curabitur et lectus vitae purus tincidunt laoreet sit amet ac ipsum. Proin tincidunt mattis nisi a scelerisque. Aliquam placerat dapibus eros non ullamcorper. Integer interdum ullamcorper venenatis. Pellentesque habitant morbi tristique senectus et netus et malesuada fames ac turpis egestas.

Featured 4

Curabitur et lectus vitae purus tincidunt laoreet sit amet ac ipsum. Proin tincidunt mattis nisi a scelerisque. Aliquam placerat dapibus eros non ullamcorper. Integer interdum ullamcorper venenatis. Pellentesque habitant morbi tristique senectus et netus et malesuada fames ac turpis egestas.

Featured 5

Curabitur et lectus vitae purus tincidunt laoreet sit amet ac ipsum. Proin tincidunt mattis nisi a scelerisque. Aliquam placerat dapibus eros non ullamcorper. Integer interdum ullamcorper venenatis. Pellentesque habitant morbi tristique senectus et netus et malesuada fames ac turpis egestas.

Showing posts with label computer and internet. Show all posts

Tuesday, 4 December 2012

How I Create Customized Email Addresses


If you want your business to look more genuine when customers or clients contact you via email, you should consider creating a custom email address ID for your business. A customized email account like info@yoursite.com looks a bit more professional than yourname@yahoo.com. I use custom email addresses for my online businesses and have decided to share with you, how to set up such email IDs for your own business.


How To Get Started

You will need a web hosting account for you to be able to create a customized email address, though you do not need to design a website before you can use your customized email ID. If you have a web hosting account, you will be able to access your cPanel, where you will set up your custom email account.

How Do I Get A Web Hosting Account?

There are load of web hosting companies out there but you can try Web4Africa or HostGator. If you are a Nigerian, you can try Web4Africa because the website allows you to pay for web hosting with Naira and even with Liberty Reserve etc.

All you need to do is to register on the sites and order for one of their hosting plans. Once your account has been activated, you will receive the login details to your cPanel in the email address you used when registering on the Web Hosting Websites.

So, How Do I Create E-mail Accounts From My Hosting Account's Control Panel (cPanel)

==> Log into your cPanel via www.yoursite.com/cpanel

==> Once at the main page, click on the "Email Accounts" icon as seen in the picture below


==> Fill the fields accordingly.


  • Type the name of the account eg info, contact, admin, yourname etc.
  •  Enter the password you want to use and the disk space you would like to assign to the mailbox. You can assign an unlimited disk space for the email account. 

==> Click on the "Create Account" button to create the mailbox.

==> You will be taken to a confirmation page. Click on "Yes" to create the customized mailbox.

That's all.

So, How Do I Check I Check Access and Send Mails With My Customized Email Address?

==> Go to www.yoursite.com/webmail

==> Enter your customized email ID in the "email Address" field and enter your password in the "password" field.


==> Click the "Log in" button.

==> Click any of the email providers: SquirrelMail, Horde, RoundCube

==> You will see your inbox and right from there, you will also see the "compose" tab for sending email messages.

That's all.

Go create your own custom emails and let me know via comments, if you face any problem.

Get Your Web hosting accounts at Web4Africa or HostGator and do not waste your time looking for websites where you can create free customized emails.

Monday, 3 December 2012

How to Create Shutdown and Reboot Tiles on Windows 8’s Start Screen


Although Windows 8 was designed to be user-friendly and intuitive, we’ve heard that plenty of users are actually struggling to find a quick way to shut down or reboot their Windows 8 device.

While the Alt + F4 hotkey does the job on desktop computers, not the same thing can be said about tablets running Windows RT or devices without a keyboard.

In this case, most users prefer to simply go over to the Start Screen, sign out of their accounts and then shut down or restart the device using the lockscreen power controls.

There’s a very simple trick, however, that allows users to create some live tiles on the Start Screen with three of the most popular power controls, namely shutdown, log off and reboot. It doesn’t take more than a few seconds to set it up and should work smoothly regardless of the Windows 8 device you’re using right then.

The only thing you have to do is to copy the following code into a new text document and change its extension to VBS, as developers over at xda-developers.com point out, so your file, for example, should be called “Softpedia.vbs.”

Make sure you configure Windows 8 to show file extensions (to do this, launch File History, click on “View” and check the “File names extensions” option displayed in the Ribbon).

So copy this text to a new text document, rename it accordingly and simply double click it run. If you wish to remove the tiles, select them in the Start Screen and hit the “Unpin from Start” option.

Friday, 30 November 2012

Building Backlinks to Earning Them The Right Way


Building quality backlinks has been said to be one of the major backbones of search engine optimization and this has been proven to be true. Although optimizing your site for search engines does not fully depend on the number of backlinks you have, it depends on other factors such as the quality of those backlinks, how effective your on-page SEO is, domain age among other things.

Most bloggers believe that it all depends on building backlinks and some even go as far as buying low quality links (which I’m guilty of) but over the years, I’ve come to realize that the most effective backlinks are those your earn, not those low quality ones you build.

how to earn backlinks to blog
 
Does commenting really work?

Well, yeah… to say the least but if you ask me, I’ll tell you I’m not a believer. A great number of those blogs you comment on already told search engines not to follow your links  and your links on those comments probably have no SEO value. I can say that 80% of blogs apply nofollow attribute to comment links and search engines most likely won’t follow those links.
 
What about buying backlinks?

Been there, done that, got hammered by google and lost my precious PR5. You effing heard me right! This blog was once a PR5 site and for a moment, I enjoyed it. It was a good feeling ranking higher than other blogs in your niche… come on, PR5 ain’t no joke but you know what? I lost it and backslided to 3, lost quite a lot of traffic and each PageRank update still got me sitting at PR3.

That is where buying huge, low quality backlinks can get you. I was lucky to bounce back by stopping all link building activity and focusing just on on-page optimization. Of course, I’m not disputing the fact that there are SEO companies who can help you build your backlinks the right way but an average blogger who isn’t earning yet might not be able to afford such services.
 
So, what is the right way to build links?

Sometimes, hiring a reputable SEO company may be the easiest way out but then, some of these so called SEO companies will only build low quality links for you using some automated tool or something. Some… not all, so don’t get me wrong.

Also, posting in forums (if they won’t ban you) can be a good place to start with. Another often neglected source of quality backlinks is social bookmarking and feed readers. I won’t be going into those fully right now but rather going to focus on earning backlinks.
 
How to earn quality backlinks

Now, what works for me as a tech blogger might not work for you if you’re in a different niche, I think we need to get that straight. For quite a while, I’ve been earning lots of natural backlinks and I can boldly say that most of these have great SEO values. However, I still believe you should be able to pick a point or two from my rantings.

1. Write concise, high quality useful posts:
You’ve probably heard this a zillion times before but it can’t be overemphasized. These types of posts often earn you backlinks from other blogs who would deem it fit to just link to you in an article as a reference.

2. Write tutorials that actually solve problems: I know this may not apply to everyone but I’ve gotten loads of backlinks using this strategy. I keep getting referrals from web forums I don’t even know where someone would ask a question and one of my links would be dropped as an answer.

3. Be grammatically fluent, eliminate typos: Not all bloggers are fluent with the use of English but you must command the language with ease if you actually want your posts to earn high quality links. Sharpening your writing skills may be a long journey you have to take before getting there.

4. Write honest reviews and testimonials: There was a day I was tracking my backlinks from Google Webmaster Tools and I saw one from Avast.com. Wondering how I got it? It was a review of their antivirus solution for Android written by a guest author, Edi Ifediri of Editiweaks.com, that got me listed on their website. Also, testimonials such as the one I wrote on my domain registrar’s site got me a backlink. See what I mean?

5. Create useful tools and widgets: I’ve already told you that some of these strategies may not apply to you if you’re not a tech blogger. Creating useful tools and widgets with your web programming knowledge can earn you loads of backlinks. Enough said.

Of course, there’s more than one way to skin a cat, there are more ways to earn those high quality links I did forget to mention or not even using at the moment. Again, if I’m going to be honest with you, you must build backlinks before you start earning them. Your on-page SEO must be tight. Doing these alone won’t get you there, it’s only gonna help along the way.

Thursday, 29 November 2012

Windows 8 Outpaces Windows 7 Upgrades, Microsoft Claims


Tami Reller, Microsoft’s head of the Windows business division, has already announced yesterday that her company had managed to sell a total of 40 million Windows 8 copies since its launch.


CEO Steve Ballmer confirmed the information a few hours ago during the annual shareholders meeting, but he has also revealed some very interesting information on the number of upgrades to the latest OS.

According to Ballmer, Windows 8 is outpacing Windows 7 upgrades, but once again, we get absolutely no official figures on this.

In other words, the number of users upgrading from the previous Windows versions to Windows 8 is bigger than the number of those who have switched from Vista or XP to Windows 7 in 2009. Ballmer previously said that Microsoft had sold a total of 4 million Windows 8 upgrades in just one weekend.

As for the overall sales of the OS, 40 million sounds like an impressive milestone, but some insiders have pointed out that Windows 8 actually missed internal sales projections.

Again, we don’t know for sure if Microsoft’s expectations have actually been higher, but one thing is for sure: everyone within the Redmond campus is terribly optimistic about Windows 8.

Temporarily Deactivate or Permanently Delete Your Facebook Account


So, I decided to get off Facebook for a week or two: no messages, no notifications. I wanted to get away from the endless photo tags, group notifications that never seem to stop and many other things I don’t seem to like about the place. I could simply decide not to log in but the pile of notifications and private messages that would be waiting after those few days would be rather too much. I thought the best thing to do was to deactivate my account for a while. I checked the settings and found out I actually have two options:

1. Permanently delete the account

2. Temporarily deactivate it

I prefer the second option because I would still be needing the account, just wanted to get off Facebook for a while. I may want to convert it from a personal profile to page later but before I deactivated the account, I made sure I transferred admin roles of my fan pages to another account. Also, I made sure I edited admin roles for my Facebook apps and added a new admin using my private Facebook account (for family and real friends only) so as not to break anything.

So, with that in place, I did what I had to do.
 
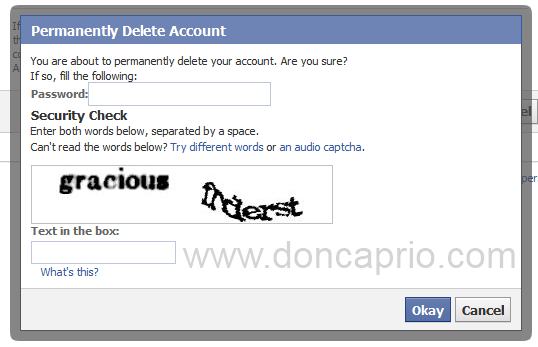
How to permanently delete your Facebook account

Now, if you still intend to use your Facebook account later in the future, you should use the second option which I’m going to explain afterwards. Using this method deletes your Facebook account: photos, videos, updates, notes… everything you’ve ever shared on Facebook (I really don’t know if Facebook actually deletes your personal info from their database anyway).

- Go to this page
- Hit the Delete My Account button
how to delete your facebook account
- Enter your password and fill in the captcha.
You account should now be permanently deleted within 14 days. If you change your mind, you can log in to Facebook before 14 days but if you don’t, your account will be completely deleted and this is not reversible.

How to Temporarily Deactivate your Facebook Account

This is the option I went for cuz it’s safer and sounded more like what I needed. You can always log back in whenever you need to use the account again but while it’s deactivated, your friends can’t interact with you; it’s like taking a break from FB. :)
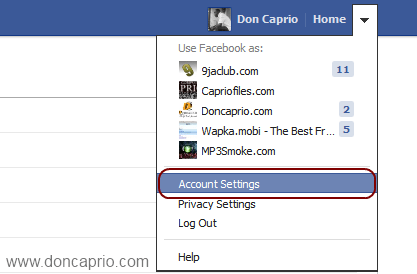
- Go to your Account Settings from the top-right menu
how to deactivate your facebook account
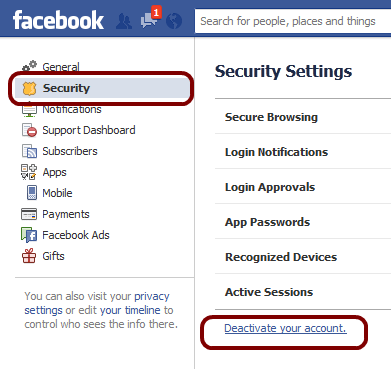
- Click on Security, then “Deactivate your account” as shown below:
how to deactivate your facebook account
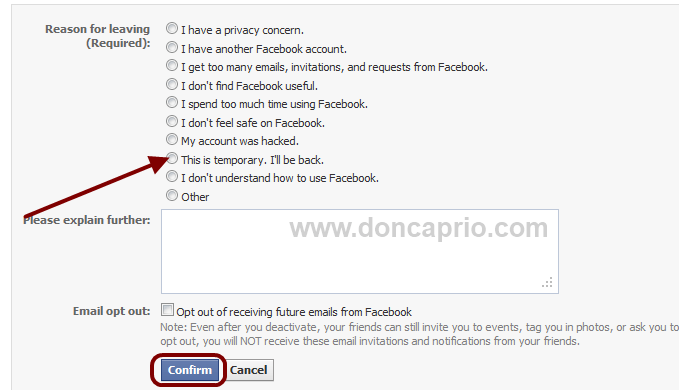
- On the next page, select your reason for deactivating your account and hit the “Confirm” button.
deactivate facebook temporarily
- Enter you password, fill the captcha verification and that’s it. Your account will be deactivated but you can always activate it back anytime you want by simply logging in to Facebook with your normal log in details.

Tuesday, 27 November 2012

5 Best Websites to Sell Your Old Gadgets

Nothing Last forever especially electronics. Gadgets  are playing an important role in everyone’s life but with  technology  getting better and more advanced, gadget are too are getting updated with new features. We desire for the most  updated gadgets to make our life easier.

Selling old gadget is not as tough as you might  think.Classified Bangalore helps  you in selling your old gadgets. People usually think classified advertisement  as newspaper ads  but today, the word is connected to web world. Classified ads are usually cheaper. You can post items you want to sell, and wait for  people to call you up. Choosing the right site to sell old gadgets can give you benefits like, no shipping charge.
sell old gadgets online
5 best places to sell your old gadgets are:
  • Olx – is a popular website which has rippled and created waves in the Indian market. One can place free ads on this website by displaying the visual images of their gadgets. On all counts visual  images tend to attract more responses . One can also mention the specifications of the device also with their contact numbers. This will encourage a wide response from the customers.
  • Quikr-  Success  is achieved when your product reaches to the audience. Advertisement plays  an important role in  selling your product. Your classified ad shows up in Quikr search engine. Quickr has thousands of  visitors each day and if you post your ad on the site it will surely sell.
  • Ebay – it takes little time for a fresher  to sell items on ebay. But before that one needs to create an account in order to buy or sell a product. Ebay is the world’s largest online auction sites. This site is perfect for you to sell your  old gadgets which has been rolling inside your drawer for years. You need to understand the guidelines in ebay in order to sell your product. Factors which you need to know are product description,  a good clear photo of the item you want to see, a fee for selling, formatting and  payment details. You need to have a good history of transaction  for your items to sell. The customer usually checks the history  before proceeding.
  • Craigslist- classified website for buying , locating and selling items. Anything and every possible item which  you wish to check out, you can locate in  craigslist. The advantage of this website is that it encourages responses from Indians as well as the international markets to the maximum.
  • Clickindia- It is completely free and doesn’t require   any amount to  post ads. It is a very simple site and  takes a second to  create and post an ad. One can keep track of their ad.

Monday, 26 November 2012

How to Backup Your cPanel Files & Database to Cloud Storage Easily

I’ve always wanted to backup all the sites on my cPanel to the cloud just in case something unexpected happens but it was almost impossible because of the huge size. This blog, along with my web forum and other sites hosted on my account is almost 6GB and I know I won’t be able to download that considering my “narrowband” internet connection and the cost of internet down here. If it were just a WordPress site, I could have decided to use Backup Buddy or something else but I’ve got Simple Machines Forum and other custom scripts installed so, I needed to backup the whole cPanel and not just a WordPress site.

How I did it

If your cPanel backup is up to 10GB and your internet connection sucks, you should think of buying a Windows VPS to get the job done instead of trying to download it to your PC. You don’t need a VPS with high specs, something minimal with Windows Server 2008 RC2 installed would do. You can buy a Windows VPS for as low as $10 per month just to get the job done and it’s what I did. ThrustVPS or Virpus may be a good start, you may be lucky enough if your host can help you install Windows Server 2008 R2 or whatever they have. Some VPS host often pre-install Windows Server 2008 R2 or later versions for you.
With this installed, you may now proceed to access your Windows Server through Remote Desktop Connection (RDC). You can connect by clicking Start > Accessories > Remote Desktop Connection


You should enter your Server IP address and Windows Server login details.

remote desktop connection
Now that you’ve logged in to your Windows Server through RDP, you cab launch Internet Explorer, login to your cPanel and generate a full backup.
Even if your internet connection is slow, you can download a file of 10GB under 1 hour using RDP. Just be sure your purchased server has enough capacity to download your cPanel.

Uploading the backup to the cloud

There are lots of Cloud storage service to choose from including SkyDrive and Google Drive among others but I went for Symform because it has more free space compared to others and there’s no file upload limit. Download and install their software and point the the application to your backup folder. You may need to install .NET Framework on your server before installing Symform.

backup cpanel to cloud storage
You can as well upload your downloaded backup to other cloud storage of your choice but the file upload limit may be a problem. you should split the file into parts with HJSplit if such is the case.

How to Add Google Adsense / HTML Codes to Genesis Without A Plugin


I’ve been using Genesis for quite a while and till just a few hours ago, I didn’t know I could actually do away with the “Post Layout” plugin I’ve been using to add Google ads and other codes to properly format my post pages. Over the last few weeks, I’ve been trying to reduce my number of installed plugins in order to decrease page load time and also CPU usage. From disabling StatPress, Auto Excerpt Everywhere, down to Social Author bio and loads of other plugins, I thought it would be a good idea to use Genesis Hooks and some conditional statements to display ads and other codes instead of relying a third-party plugin I didn’t really need.
Finally, I was able to display the ads and other stuffs just the way I wanted it and right now, I’m using Genesis hooks to display everything you see above and below posts. As a matter of fact, it rather fun digging into the code side of things… got to learn more WordPress conditional statements (I never really did care because I didn’t know how useful they were).
We’re adding these adsense codes or custom PHP / HTML in five positions in this tutorial, it’s up to you to choose where you want your stuffs to appear:
1. The sidebar
2. Below the header
3. Below post title
4. After post content
5. Above posts in archive pages

1. Adding ad codes to the sidebar

Well, I’m not sure I need to explain this but for beginners, you only need to go to Appearance > Widgets. Drag the text widget to your desired location and paste the ad code or custom HTML. That’s it.

2. Adding Google Adsense below the header

I already explained this in a previous post but this is going to be a bit advanced. For someone like me who has a skycrapper on the sidebar and two ad units on post pages, I would like hide that leaderboard below the menu on post pages. This is where conditional statements come in; you only need to add a snippet of code to tell the advert not to appear on single posts and pages.
- Download and install Simple Genesis Hooks
- Go to Genesis > Simple Hooks
- Scroll down till you get to the content section
- In the box labelled genesis_before_content_sidebar_wrap Hook, paste this code:

- Be sure to mark Execute Shortcodes on this hook and Execute PHP on this hook
The part in red is the conditional statement that tells the ad not to appear on single posts and pages. So, this appears on the home page and all archive pages and with this implemented the right way, you won’t be having more than three ad units on each of your site pages. You can even take this further if you’ve done PHP programming or any sort of programming before. It’ll be much more easier for you to manipulate this statements and make your ads appear exactly where you want them to be.

3. Below post title

Now we’re going to add adsense below post title and we’re still gonna use Simple Hooks and conditional statements. The first time I did this, the Google Adsense ads appeared on archive pages and the home page till I added a statement that forced the ads to appear on single posts and pages only.
- Go to Genesis Simple hooks settings page and find genesis_before_post_content Hook
- In the box, paste this code:

- Also, mark Execute Shortcodes on this hook and Execute PHP on this hook
The part in red tells the advert to appear on single posts or pages. It’s gonna be hidden from the homepage and archive pages and I’m sure you don’t wanna show it there, do you?

4. After post content

You’re still using the same code you used right above but you’re only going to add it to a different position, OK?
- Search for genesis_after_post_content Hook
- Paste the code up there in to the box and save.
You’ll probably notice that the post meta (tags and categories) appear above the advert. You can reposition this by marking the box that says Unhook genesis_post_meta() function from this hook?.
- Below the code already in the box, now add this:

5. Above posts in archive pages

Still tweaking the conditional statements, we can make ads appear on archive pages only. This include category pages, tag pages, author pages and so on.
To make ads appear directly above posts on archive pages:
- go to Genesis Simple Hooks settings page and search for genesis_before_loop
- Paste this