Labels

5 Best Websites to Sell Your Old Gadgets

Nothing Last forever especially electronics. Gadgets are playing an important role in everyone’s life but with technology getting better and more advanced, gadget are too are getting updated with new features. We desire for the most updated gadgets to make our life easier.

How To Add Google Plus Followers Gadget To Blogger!

One of the best perks of using Google is, it has products that seamlessly integrate with each other to provide an easy and comprehensive interface to users. For example, Google Drive can be used to attach files with emails quickly. You can +1 posts outside Google+, and share search results on Google Plus. You can even auto-publish your Blogger blog feed to your G+ profile. And that is by no means the end of it. In fact, Google just announced a brand new feature, the Google Plus Followers gadget for blogger blogs! This new Google Plus followers' gadget for blogspot blogs will provide another layer of integration between your Google Plus profile and your Blogger/Blogspot blog.

Featured 3

Curabitur et lectus vitae purus tincidunt laoreet sit amet ac ipsum. Proin tincidunt mattis nisi a scelerisque. Aliquam placerat dapibus eros non ullamcorper. Integer interdum ullamcorper venenatis. Pellentesque habitant morbi tristique senectus et netus et malesuada fames ac turpis egestas.

Featured 4

Curabitur et lectus vitae purus tincidunt laoreet sit amet ac ipsum. Proin tincidunt mattis nisi a scelerisque. Aliquam placerat dapibus eros non ullamcorper. Integer interdum ullamcorper venenatis. Pellentesque habitant morbi tristique senectus et netus et malesuada fames ac turpis egestas.

Featured 5

Curabitur et lectus vitae purus tincidunt laoreet sit amet ac ipsum. Proin tincidunt mattis nisi a scelerisque. Aliquam placerat dapibus eros non ullamcorper. Integer interdum ullamcorper venenatis. Pellentesque habitant morbi tristique senectus et netus et malesuada fames ac turpis egestas.

Showing posts with label tip and tricks. Show all posts

Friday, 7 December 2012

Avast for Android Updated with Low-Battery Notification in Anti-Theft Component

Avast has just updated its Android security application with new features and bug fixes. Several UI tweaks have been included as well, along with Turkish language pack.

Avast Mobile Security application for Android devices features simplified Anti-Theft installation and comes with support for Boat Browser and Boat Browser Mini apps in Web Shield.

The latest version also offers a new “low-battery notification” feature in Anti-Theft component, as well as lots of tweaks and bug fixes that have yet to be detailed.

Keep in mind that the Network Meter now has a “Billing day” option and the user interface has suffered some minor changes. Developers have also fixed several issues in Firewall and Call/SMS filter.

avast! Mobile Security 2.0.3377 is now available as a free download via Google Play store and it should be fully compatible with all devices running Android 2.1 and up.

Tuesday, 4 December 2012

How I Create Customized Email Addresses


If you want your business to look more genuine when customers or clients contact you via email, you should consider creating a custom email address ID for your business. A customized email account like info@yoursite.com looks a bit more professional than yourname@yahoo.com. I use custom email addresses for my online businesses and have decided to share with you, how to set up such email IDs for your own business.


How To Get Started

You will need a web hosting account for you to be able to create a customized email address, though you do not need to design a website before you can use your customized email ID. If you have a web hosting account, you will be able to access your cPanel, where you will set up your custom email account.

How Do I Get A Web Hosting Account?

There are load of web hosting companies out there but you can try Web4Africa or HostGator. If you are a Nigerian, you can try Web4Africa because the website allows you to pay for web hosting with Naira and even with Liberty Reserve etc.

All you need to do is to register on the sites and order for one of their hosting plans. Once your account has been activated, you will receive the login details to your cPanel in the email address you used when registering on the Web Hosting Websites.

So, How Do I Create E-mail Accounts From My Hosting Account's Control Panel (cPanel)

==> Log into your cPanel via www.yoursite.com/cpanel

==> Once at the main page, click on the "Email Accounts" icon as seen in the picture below


==> Fill the fields accordingly.


  • Type the name of the account eg info, contact, admin, yourname etc.
  •  Enter the password you want to use and the disk space you would like to assign to the mailbox. You can assign an unlimited disk space for the email account. 

==> Click on the "Create Account" button to create the mailbox.

==> You will be taken to a confirmation page. Click on "Yes" to create the customized mailbox.

That's all.

So, How Do I Check I Check Access and Send Mails With My Customized Email Address?

==> Go to www.yoursite.com/webmail

==> Enter your customized email ID in the "email Address" field and enter your password in the "password" field.


==> Click the "Log in" button.

==> Click any of the email providers: SquirrelMail, Horde, RoundCube

==> You will see your inbox and right from there, you will also see the "compose" tab for sending email messages.

That's all.

Go create your own custom emails and let me know via comments, if you face any problem.

Get Your Web hosting accounts at Web4Africa or HostGator and do not waste your time looking for websites where you can create free customized emails.

Friday, 30 November 2012

5 Alternative Chat Apps to Blackberry Messenger


The various IM apps around make BBM look irrelevant. Why? BBM is only limited to blackberry phones and you can’t use it without a BB PIN (Blackberry Prisoner Identification Number) but these alternatives work across all platforms.

1. Skype

alternative to blackberry messenger
Skype is probably the most popular IM application and as a matter of fact, it’s more than just an instant messaging app. With Skype, you can keep in touch with family and friends and it supports video calls on almost all mobile platforms except, of course, the overrated Blackberry. Even Blackberry’s most sophisticated smartphone doesn’t support video calls on skype for now.
Skype to Skype calls are free and you may even buy call credits at a very reduced rate.

2. Whatsapp

whatsapp messenger
I’m not the chit-chat type that spends the whole time chatting with people on social networks but Whatsapp really got me. With over 100 contacts on my phone already using it, it’s probably the best alternative to Blackberry messenger since it consumers very little data and it works across all platforms. Even almost all BBM users have Whatsapp installed on their device to keep in touch with their contacts who do not have that thing they call Blackberry PIN.

3. Viber

viber - blackberry messenger alternative
Although the latest blackberry messenger can make voice calls over Wi-Fi which is quite a big step forward for the company and something very appreciated by all BBM users to say the least, I’ve been doing that with Viber and Skype for a very long time over 3G. Viber is very widely used and also, the free VoIP feature is great.

4. Facebook Messenger

facebook messenger
This doesn’t need an introduction and you definitely can’t deny the fact that Facebook is the largest social network right now and when it comes to instant messaging, Facebook chat has a lot more users than any other IM application. There’s a Facebook messenger for every phone, even feature phones.

5. Live Profile

liveprofile
Compared to others, I use this a lot less but it’s a great instant messaging app with a cool UI.
You got a lot of alternatives and the choice is yours. I have most of these installed on my iPhone and Nokia N97 and I still keep in touch with my loved ones. Not sure I’m gonna get a Blackberry device just because of BBM…

How To Add Google Plus Followers Gadget To Blogger!

One of the best perks of using Google is, it has products that seamlessly integrate with each other to provide an easy and comprehensive interface to users. For example, Google Drive can be used to attach files with emails quickly. You can +1 posts outside Google+, and share search results on Google Plus. You can even auto-publish your Blogger blog feed to your G+ profile. And that is by no means the end of it. In fact, Google just announced a brand new feature, the Google Plus Followers gadget for blogger blogs! This new Google Plus followers' gadget for blogspot blogs will provide another layer of integration between your Google Plus profile and your Blogger/Blogspot blog.


The Google Plus followers' gadget

Connecting your Google Plus profile with your blog is a great way to enhance your readership by increasing your followers and engaging better with your audience. You can auto-publish your blog posts on your Google Plus stream so as to deliver your content right where your readers want it delivered. Those readers can then recommend your content directly, which can lead to more exposure. This new Google Plus followers widget is another step towards enhancing your readership and boosting your authority.

This widget will tell the world how many people are following you, and will also show them some friendly faces (different for each person). It also has a follow button by default, which lets users follow your Google Plus profile page with a single click. This will help in getting your content across multiple streams, and to reach more readers on a more personal level through your blog.

 Adding this widget to your Blogger blog is really simple. But for it to work, you first have to connect your blogger profile with your Google Plus account. We have detailed the process in a previous post, so make sure you read it first.

    How to automatically share blog updates on Google Plus
Once done, visit the Layout tab on your blogger dashboard, and select "Add a Gadget". You will then be able to see and add this widget easily to your blog.

A note from Google: For those who are using Google Friend Connect followers' widget, they can keep using it, even though Google retired most of Friend Connect services earlier this year. For the time being, it will keep running on Blogger.

Thursday, 29 November 2012

ETISALAT PC CHEAT


TUNNELGURU HHT $ VPN NOW WORKING ON ETISALAT WITH 0.00k


DOWNLOAD http://allsoftware.com.ng/TGv1.6.0.2_WIN_32Bit.zip for people using 32bit

DOWNLOAD http://allsoftware.com.ng/TGv1.6.0.2_WIN_64Bit.zip for people using 64bit

EXTRACT AND CONFIGURE LIKE THIS


Web Host :     mobile.etisalat.com   

Web Port : 80#443

Enter username and password here ( get it at http://tunnelguru.com/registration.php )

Proxy URL :    http://etisalat.com/

Proxy Host : 83.170.84.227 or 77.92.68.143 or 93.114.43.209 or 77.92.68.143 or
 93.114.44.130

Port:                80#443

Uncheck  SSL, Buffered

Select : INTERNET-3-G

Start Proxy.


configure browser to 127.0.0.1 Port  6051  ( fast )  SSL: 6052 and 6055 (6055 faster)

OR IF YOU WANT TO USE PROXIFIER THEN CONFIGURE PROXIFIER WITH
    6052 ( slow ) , 6055 ( fast ) 

CONFIGURE YOUR MODEM APN TO etisalat

FOR TORRENT DOWNLOAD PLS USE 93.114.44.130 OR
93.114.43.209 FOR PROXY HOST (if normal is used with torrent client, account will be suspended)

CONNECT WITH 0.00KOBO

DOWNLOAD SPEED IS UPTO 980kb/s


CONTACT ME  ON 08137843366 OR polisezor 07030737188  or MD§K 08030953171 OR VIA PM IF YOU NEED PREMIUM INSTANT ACCOUNT

ALL THOSE THAT HAVE PREMIUM TUNNELGURU ACCOUNT VIA MULTILINKS OR MTN CAN ALSO USE THAT SAME USERNAME AND PASSWORD INSTEAD OF BUYING NEW ONE

THOSE PEOPLE THAT HAVE WARN ME NOT TO POST IT , I AM SORRY TO DISAPPOINT YOU AGAIN

ONE LOVE


THIS IS HOW TO USE PROXIFIER WITH ETISALAT

DOWNLOAD PROXIFIER FROM DOWNLOAD SECTION AND USE THIS SCREENSHOT

This image has been resized. Click this bar to view the full image. The original image is sized 615x296.

This image has been resized. Click this bar to view the full image. The original image is sized 615x282.

This image has been resized. Click this bar to view the full image. The original image is sized 615x333.


THE ONLY PERSON NOT ALLOWED TO MAKE A SINGLE POST IN THIS THREAD IS CAST . PLS KINDLY STAY AWAY BECAUSE I WILL NOT ALLOW POLITICS IN THIS THREAD .THANKS AS YOU HONESTLY COMPLY


PAY 1,000

Bank Name: GT BANK PLC
Account Name: BABALOLA OLASEHINDE ( MAINGATE )
Account Number: 0019406809


Gt Bank
Account Name: Moses Ubogun (polisezor)
Account No:  0033584363


BANK: Eco Bank
ACCNT NAME: Kninmi musa (MD§K™)
ACCNT NO: 0053471544


 TUNNELGURU VPN NOW WORKING ETISALAT WITHOUT BIS

To Run Etisalat  VPN , at First
1) Start HTTP(s) Tunnel with normal Settings.
2) switch to vpn TAB PROXY HOST 109.163.227.172
3) tick use proxy --- your modem ip:6055
6) protocol: TCP

SEE SCREENSHOT SETTINGS


* 1.jpg (47.94 kB, 539x330 - viewed 386 times.)

* 2.jpg (44.87 kB, 532x309 - viewed 316 times.)

* 3.jpg (40.69 kB, 521x310 - viewed 303 times.)

* http side.jpg (70.48 kB, 765x768 - viewed 325 times.)

* vpn side.jpg (60.27 kB, 765x768 - viewed 356 times.)

Temporarily Deactivate or Permanently Delete Your Facebook Account


So, I decided to get off Facebook for a week or two: no messages, no notifications. I wanted to get away from the endless photo tags, group notifications that never seem to stop and many other things I don’t seem to like about the place. I could simply decide not to log in but the pile of notifications and private messages that would be waiting after those few days would be rather too much. I thought the best thing to do was to deactivate my account for a while. I checked the settings and found out I actually have two options:

1. Permanently delete the account

2. Temporarily deactivate it

I prefer the second option because I would still be needing the account, just wanted to get off Facebook for a while. I may want to convert it from a personal profile to page later but before I deactivated the account, I made sure I transferred admin roles of my fan pages to another account. Also, I made sure I edited admin roles for my Facebook apps and added a new admin using my private Facebook account (for family and real friends only) so as not to break anything.

So, with that in place, I did what I had to do.
 
How to permanently delete your Facebook account

Now, if you still intend to use your Facebook account later in the future, you should use the second option which I’m going to explain afterwards. Using this method deletes your Facebook account: photos, videos, updates, notes… everything you’ve ever shared on Facebook (I really don’t know if Facebook actually deletes your personal info from their database anyway).

- Go to this page
- Hit the Delete My Account button
how to delete your facebook account
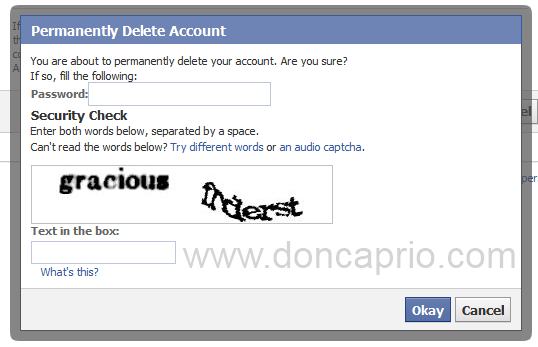
- Enter your password and fill in the captcha.
You account should now be permanently deleted within 14 days. If you change your mind, you can log in to Facebook before 14 days but if you don’t, your account will be completely deleted and this is not reversible.

How to Temporarily Deactivate your Facebook Account

This is the option I went for cuz it’s safer and sounded more like what I needed. You can always log back in whenever you need to use the account again but while it’s deactivated, your friends can’t interact with you; it’s like taking a break from FB. :)
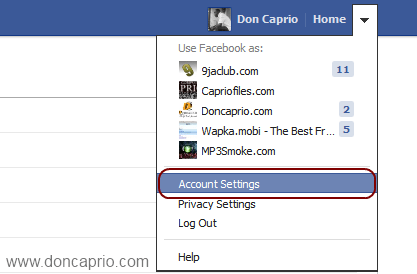
- Go to your Account Settings from the top-right menu
how to deactivate your facebook account
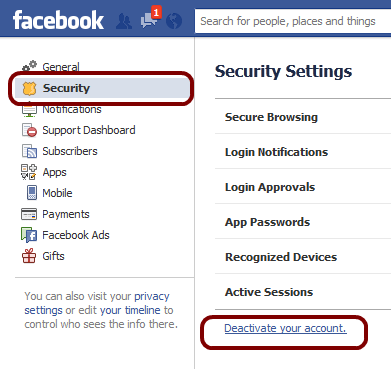
- Click on Security, then “Deactivate your account” as shown below:
how to deactivate your facebook account
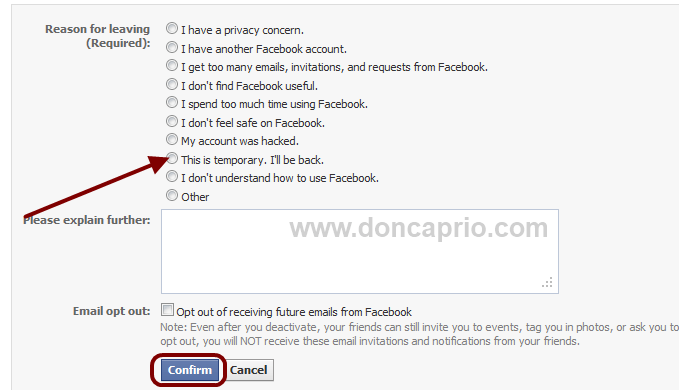
- On the next page, select your reason for deactivating your account and hit the “Confirm” button.
deactivate facebook temporarily
- Enter you password, fill the captcha verification and that’s it. Your account will be deactivated but you can always activate it back anytime you want by simply logging in to Facebook with your normal log in details.

Monday, 26 November 2012

How to Backup Your cPanel Files & Database to Cloud Storage Easily

I’ve always wanted to backup all the sites on my cPanel to the cloud just in case something unexpected happens but it was almost impossible because of the huge size. This blog, along with my web forum and other sites hosted on my account is almost 6GB and I know I won’t be able to download that considering my “narrowband” internet connection and the cost of internet down here. If it were just a WordPress site, I could have decided to use Backup Buddy or something else but I’ve got Simple Machines Forum and other custom scripts installed so, I needed to backup the whole cPanel and not just a WordPress site.

How I did it

If your cPanel backup is up to 10GB and your internet connection sucks, you should think of buying a Windows VPS to get the job done instead of trying to download it to your PC. You don’t need a VPS with high specs, something minimal with Windows Server 2008 RC2 installed would do. You can buy a Windows VPS for as low as $10 per month just to get the job done and it’s what I did. ThrustVPS or Virpus may be a good start, you may be lucky enough if your host can help you install Windows Server 2008 R2 or whatever they have. Some VPS host often pre-install Windows Server 2008 R2 or later versions for you.
With this installed, you may now proceed to access your Windows Server through Remote Desktop Connection (RDC). You can connect by clicking Start > Accessories > Remote Desktop Connection


You should enter your Server IP address and Windows Server login details.

remote desktop connection
Now that you’ve logged in to your Windows Server through RDP, you cab launch Internet Explorer, login to your cPanel and generate a full backup.
Even if your internet connection is slow, you can download a file of 10GB under 1 hour using RDP. Just be sure your purchased server has enough capacity to download your cPanel.

Uploading the backup to the cloud

There are lots of Cloud storage service to choose from including SkyDrive and Google Drive among others but I went for Symform because it has more free space compared to others and there’s no file upload limit. Download and install their software and point the the application to your backup folder. You may need to install .NET Framework on your server before installing Symform.

backup cpanel to cloud storage
You can as well upload your downloaded backup to other cloud storage of your choice but the file upload limit may be a problem. you should split the file into parts with HJSplit if such is the case.

Sunday, 25 November 2012

5 Extremely Useful iPad Apps

You must be looking for the best iPad apps after you have bought an iPad for yourself. The world of apps for the gadgets of Apple is growing bigger and better day by day. Many independent parties or individuals have started to develop several applications. Because of the increase in demand and supply, several websites are publishing some fantastic iPad apps. Along with that, many tech blogs like Gizmodo and Lifehacker are talking about iPad and its applications in most of the posts.
Covering all the free best applications of iPad in one single article is actually impossible. Therefore, this article discusses about some of the most popular iPad applications that are being used most commonly today.

Most Popular iPad Apps

  1. kindle


    This application of iPad is becoming increasingly popular among the users of iPad. This app was released after the initial launch of the tablet, and it was liked a lot by all eBook readers. Most of the people appreciated and considered it as a fabulous substitute for Amazon Kindle.

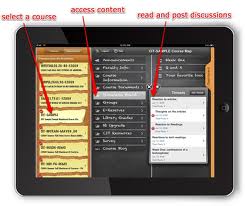
    2. Blackboard Mobile Learn


    It has the potential of being one of the most popular iPad apps among students. With the help of this application, students can communicate with their teachers via online. The teachers can write blogs, post grades for the assignments of the students and also give feedback.

    3. Groovemaker

    If you want to become a DJ or have immense love for music, this app is certainly going to attract you. It is nothing different from having a tablet with an in-built DJ. It has the capacity to do almost all the things that can be done by advanced DJ software. You can make a fantastic Mobile DJ with this software and you will be greatly in demand among your friends whenever there will be get-togethers.

    4. Netflix

    Netflix is a fantastic iPad app as far as streaming media is concerned. It has already becoming one of the most popular iPad apps commonly used for online media streaming. Netflix allows searching for shows and movies and can also set up a queue which the other streaming applications cannot do.

    5. Pianist Pro

    This iPad will provide you with the ultimate solution if you feel that it would have been great if you had your keyboard or piano with you while travelling. This application is very popular with the iPhone users too. The usability of the application was greatly enhanced after it got ported in iPad. The iPad Pianist Pro version is really sufficient as far as playing a whole song is concerned.